

Introduction
Welcome to this tutorial on setting up a new Spring Boot project in VS Code! In this tutorial, we will guide you through the process of creating a Spring Boot project and installing the necessary extensions in VS Code.
Creating the Project
To start, let’s create a new folder for our project in VS Code. Open the newly created folder and trust the author. Next, we will install some useful VS Code extensions for Java Spring Boot development.
Installing VS Code Extensions
We will begin by installing an extension pack called “Extension Pack for Java“. This pack contains most of the essential tools and features needed for Java development in VS Code. It includes support for writing, testing, and debugging Java applications.
Next, we will install the “Spring Boot Extension Pack“. This pack is specifically designed for developing and deploying Spring Boot applications.
Generating a Maven Spring Boot Project
Now that we have the necessary extensions installed, we can use the Spring Initializer to generate a new Spring Boot project. Open the VS Code command palette by pressing “Ctrl + Shift + P” and type “Spring Initializer”. Choose the most recent Spring Boot version from the list and select the Java language option. Provide a name and package for your application.
For the project type, choose “War” since War files are specifically designed for web applications. Select the newest Java version available. Finally, choose some useful dependencies for your project such as “Spring Boot Dev Tools” and “Lombok“. These dependencies provide features like fast restart, automatic code generation, and boilerplate code reduction.
Working with the Project
After creating the project, you will see the “pom.xml” file.
<?xml version="1.0" encoding="UTF-8"?>
<project xmlns="http://maven.apache.org/POM/4.0.0" xmlns:xsi="http://www.w3.org/2001/XMLSchema-instance"
	xsi:schemaLocation="http://maven.apache.org/POM/4.0.0 https://maven.apache.org/xsd/maven-4.0.0.xsd">
	<modelVersion>4.0.0</modelVersion>
	<parent>
		<groupId>org.springframework.boot</groupId>
		<artifactId>spring-boot-starter-parent</artifactId>
		<version>3.2.2</version>
		<relativePath/> <!-- lookup parent from repository -->
	</parent>
	<groupId>com.nerdiccoder.example</groupId>
	<artifactId>example</artifactId>
	<version>0.0.1-SNAPSHOT</version>
	<packaging>war</packaging>
	<name>example</name>
	<description>Demo project for Spring Boot</description>
	<properties>
		<java.version>21</java.version>
	</properties>
	<dependencies>

		<dependency>
			<groupId>org.springframework.boot</groupId>
			<artifactId>spring-boot-starter-actuator</artifactId>
		</dependency>

		<dependency>
			<groupId>org.springframework.boot</groupId>
			<artifactId>spring-boot-starter-web</artifactId>
		</dependency>

		<dependency>
			<groupId>org.springframework.boot</groupId>
			<artifactId>spring-boot-devtools</artifactId>
			<scope>runtime</scope>
			<optional>true</optional>
		</dependency>
		<dependency>
			<groupId>org.projectlombok</groupId>
			<artifactId>lombok</artifactId>
			<optional>true</optional>
		</dependency>
		<dependency>
			<groupId>org.springframework.boot</groupId>
			<artifactId>spring-boot-starter-tomcat</artifactId>
			<scope>provided</scope>
		</dependency>
		<dependency>
			<groupId>org.springframework.boot</groupId>
			<artifactId>spring-boot-starter-test</artifactId>
			<scope>test</scope>
		</dependency>
	</dependencies>

	<build>
		<plugins>
			<plugin>
				<groupId>org.springframework.boot</groupId>
				<artifactId>spring-boot-maven-plugin</artifactId>
				<configuration>
					<excludes>
						<exclude>
							<groupId>org.projectlombok</groupId>
							<artifactId>lombok</artifactId>
						</exclude>
					</excludes>
				</configuration>
			</plugin>
		</plugins>
	</build>

</project>
This file defines the build dependencies and project information. Click the “Install” button for the recommended dependency analytics by Red Hat. This will help identify and prevent errors related to null references.
Before we can build the project, we need to download and install Maven. Extract the downloaded Maven zip file and move the extracted files to an appropriate location. Add the Maven location to your user environment and path.
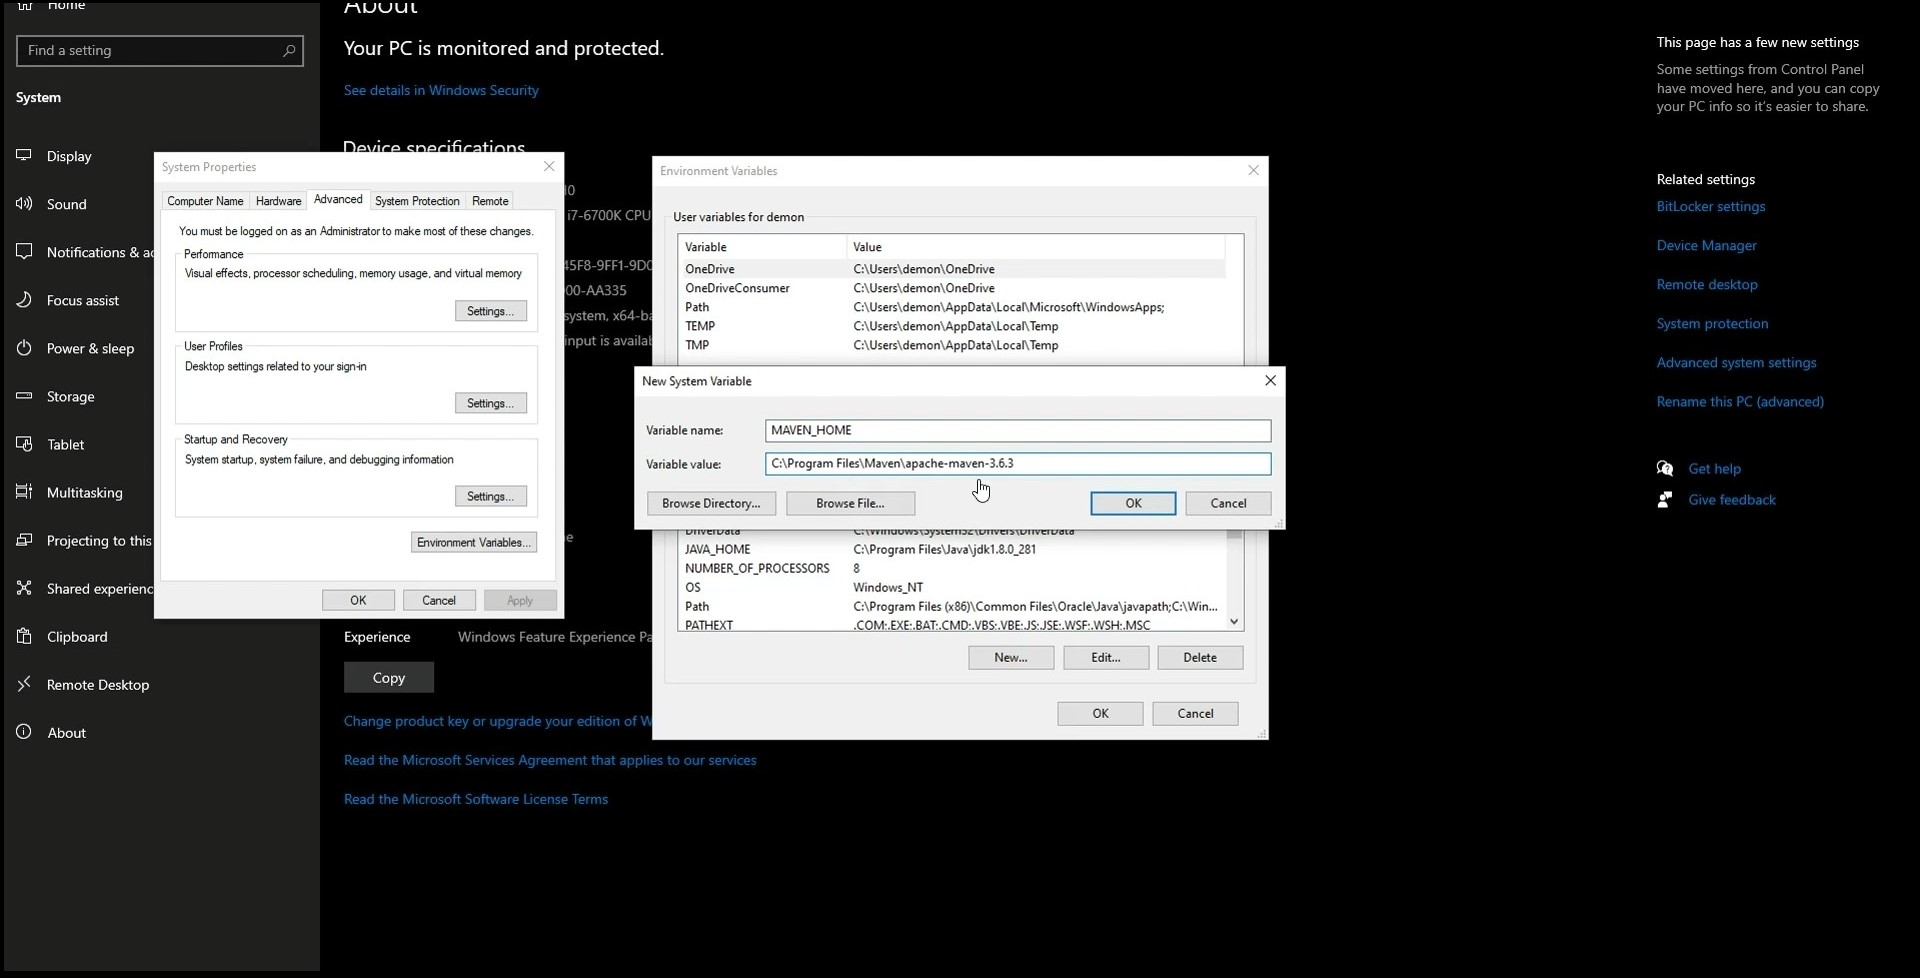
Restart VS Code to ensure that the changes take effect. If you encounter any errors related to missing Java versions, make sure to update the Java home environment variable to point to the new Java version.
Running the Application
With everything set up, we can now run the Spring Boot application. Press the play icon and select “Run Java”. Allow network access if prompted, but only if you trust the network you are on. Congratulations, your server is now alive on port 8080!
Exploring the Application
Let’s take a look at the structure of the generated Java code. The “application.properties” file allows you to configure various application settings such as server port and database URLs. The main class annotated with “@SpringBootApplication” enables auto-configuration, component scanning, and additional configurations for a Spring Boot application.
package com.nerdiccoder.example.example;

import org.springframework.boot.SpringApplication;
import org.springframework.boot.autoconfigure.SpringBootApplication;

@SpringBootApplication
public class ExampleApplication {

	public static void main(String[] args) {
		SpringApplication.run(ExampleApplication.class, args);
	}

}
The “ServletInitializer” class extends “SpringBootServletInitializer” and is used for deploying Spring Boot applications to a servlet container.
package com.nerdiccoder.example.example;

import org.springframework.boot.builder.SpringApplicationBuilder;
import org.springframework.boot.web.servlet.support.SpringBootServletInitializer;

public class ServletInitializer extends SpringBootServletInitializer {

	@Override
	protected SpringApplicationBuilder configure(SpringApplicationBuilder application) {
		return application.sources(ExampleApplication.class);
	}

}
Adding Functionality
Now that we have a basic Spring Boot application running, let’s add some functionality. We will start by creating a simple “Hello World” controller.
Add the “@RestController” annotation to the class, which combines the “@Controller” and “@ResponseBody” annotations for handling HTTP requests and responses in a Spring MVC application.
Add a method annotated with “@GetMapping” to the class. This method maps HTTP GET requests to handler methods. VS Code will generate the boilerplate code for us, so we don’t have to write it from scratch.
Let’s name the new mapping “/hello” and simply return the string “Hello, World!” for this example.
package com.nerdiccoder.example.example;

import org.springframework.web.bind.annotation.RestController;
import org.springframework.web.bind.annotation.GetMapping;


@RestController
public class HelloWorld {

    @GetMapping("/hello")
    public String getMethodName() {
        return "Hello World!";
    }

}
Now, let’s test the new endpoint by making a GET request to “/hello”. You should see the response “Hello, World!”
Handling Exceptions
In order to provide better error handling, let’s create a global exception handler. Add a new Java file named “GlobalExceptionHandler” and annotate it with “@ControllerAdvice”. This annotation offers global exception handling, data binding, and model enhancement for controllers.
Inside the class, create a method annotated with “@ExceptionHandler”. This annotation marks methods in Spring applications to handle exceptions thrown by controller methods. In this example, we will return an internal server error.
package com.nerdiccoder.example.example;

import org.springframework.http.HttpStatus;
import org.springframework.http.ResponseEntity;
import org.springframework.web.bind.annotation.ControllerAdvice;
import org.springframework.web.bind.annotation.ExceptionHandler;

@ControllerAdvice
public class GlobalExceptionHandler {

    // Default exception
    @ExceptionHandler(Exception.class)
    public ResponseEntity<String> handleGlobalException(Exception ex) {
        return ResponseEntity.status(HttpStatus.INTERNAL_SERVER_ERROR).body("An error occurred!");
    }
}
Now, when an exception occurs in our application, it will be handled by this global exception handler and return an appropriate error response.
Conclusion
Congratulations! You have successfully set up a new Spring Boot project in VS Code and added functionality to it. Spring Boot provides a great framework for developing Java applications, and VS Code offers a lightweight and efficient development environment.
If you have any questions or would like to see more tutorials like this, please let me know in the comments below.
Hope you enjoyed and until next time stay nerdic!
Join My Coding Course and Transform Your Future!
Turn Code Into Cash: Become a Professional Full Stack Developer is more than just a program—it’s a pathway to new opportunities and a brighter future in tech. Join me and start transforming your dreams into reality today!

Leave a comment